| 06-10-02
I will not hazard a guess on when it happened, but the history of packaging
milk for grocery stores would suggest that it was some time after the demise
of high-button shoes and glass milk bottles. However, I can tell you that
I have always lived by the old saw which says "necessity is the mother
of invention," and necessity obviously motivated my discovery of the Bayou
Bill Shirt-Pocket Pail which offers many uses.
The importance of creating a shirt-pocket pail and making it an integral
part of your outdoor paraphernalia lies in the fact that the products of
nature show up at strange and unexpected times. The outdoors person who
carries a shirt-pocket pail will be prepared to harvest nature's bounties
at all times.
Creating the Bayou Bill Shirt-Pocket Pail
is as simple as combining a half-gallon, waxed-paper, or light plastic
milk or fruit juice container with a strong cord for a bail, a few plastic
bags, and some paper clips.
In five easy steps, here is how I do it:
-
Step 1--With milk or juice removed from the container, wash it thoroughly
with cold running water, and dry it (inside and out).
-
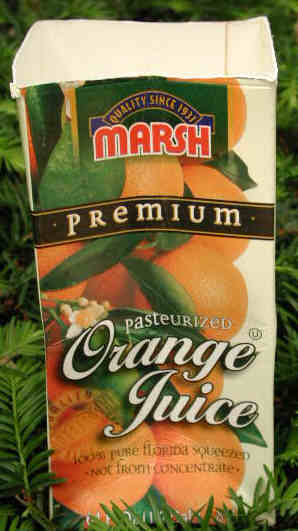
Step 2--With a sharp knife or scissors, cut off the angled top of
the container, which creates the pouring spout. This will create an upright
container that is roughly 3 ¾ (three and three-fourths) of an inch
square and roughly 7 inches tall. [See illustration
below.]
-
Step 3--Grasp the quadrangular container firmly on opposite sides
with thumbs and second, third and fourth fingers of each hand. Then
with index fingers of both hands push the sides of the container in simultaneously
and work this crease downward until the bottom of the container buckles
upward. This allows the container to flatten out. (Older milk containers,
which are somewhat less sturdy than their present-day counterparts, can
be folded just like brown paper grocery bags. With these containers the
bottom remains flat (it does not buckle) and the sides of the container
are merely wrapped around the bottom.)
-
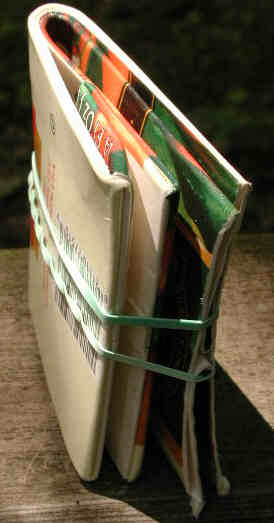
Step 4---Wrap the top of the flattened container around its lower
half to create a ¾ (three-fourths) to one inch flattened container.
Weight it down with a heavy object to give the folds a partial permanence.
A tight rubber band will keep the container flat and will render it small
enough to be carried in a shirt pocket. [See illustration
below.]
-
Step 5--To convert the flattened container into a pail, force the
sides apart and make the bottom flat, almost like it was before it was
folded. Punch holes on opposite sides at the top and fashion a bail from
strong cord. Insert a plastic bag large enough to fill the container and
secure it with paper clips on the four sides at the top.
When a plastic bag is filled with berries or other natural produce, remove
it and close the top with a twister (the little strip used to close plastic
bread sacks). Then insert another plastic bag to continue harvesting berries
or other items.
A Tip or Two--Waxed paper milk containers
of the past are better than the sturdier juice containers found in grocery
stores now, because they are easier to fold and crease. But either will
work . . . Carry the filled bags by grasping their tops with the
fingers or in a basket to avoid crushing berries or other soft items .
. . store filled bags in cool, shady places until ready to take them home.

|

|
 |
| Your
carton should look like this after completing the instructions in Step
2 above. |
After
Step 4, your Shirt-Pocket Pail is ready for travel. |
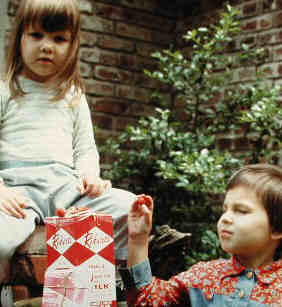
Daughters
Patty (top) and Joan model one of my early shirt pocket pails along with
half a gallon of wild strawberries. |
|

